"Hi, I'm Sunday and yes, that's my name! I love DIY projects and the thrill of making something great-for cheap. I'm here to share tips for the DIY'er at heart from a wife, mom, youth pastor and shop owner, Sweet Transformations (with my amazing sisters)! What do you do with your Sunday Afternoon?"
Hello to all the GOMHP readers! First I would like to say thank you to Brooke for allowing me to visit today, what a sweet gal!
I love unique decor! I especially love to re-purpose something into unique decor. Today I want to show you a couple of cute ways to decorate with shutters.
{Personalized Baby Shutter}
First, I want to share an idea for a personalized baby gift (you could use this idea for a wedding or birthday gift as well) that I made for my new nephew. Making something special for a baby is always a good idea! I started with an old shutter, primed it with Kilz Spray Primer and then spray painted it using Rust-Oleum Enamel Spray in white for a glossy look.
 Since this was for my sissy-in-law, I was able to nab her blue nursery paint and use it on the inside of the shutter for a perfect match.
For the baby's name I used wooden flags I ordered from one of my favorite online stores Pick Your Plum and stickers from Michael's.

First, I centered the stickers on the flags and then spray painted over them.

After allowing them to completely dry, I removed the stickers and WHALA- letters! Last, I distressed them a little bit so they didn't look too stark. I strung the flags together with jute twine and hung the ends from cute glass knobs.

This personalized shutter is a unique and super cute gift. The bonus was it was a big hit!
Here are a few other ideas for decorating with shutters:
{Wall Decor & Mantles}
For our shop, Sweet Transformations, we're always on the hunt for items we can re-purpose and sell. One day we lucked out on a Craigslist add for free shutters - lots of them.
We painted these shutters a variety of spring colors. We also added hardware so something could be hung on them if desired. They could be propped up on a mantle or simply hung on the wall.

You can place the hardware to hang them vertically or horizontally.

Check out this amazing Shutter Wall from Olive and Love.

Laurie from Tip Junkie shared this gorgeous mantle idea on her blog.

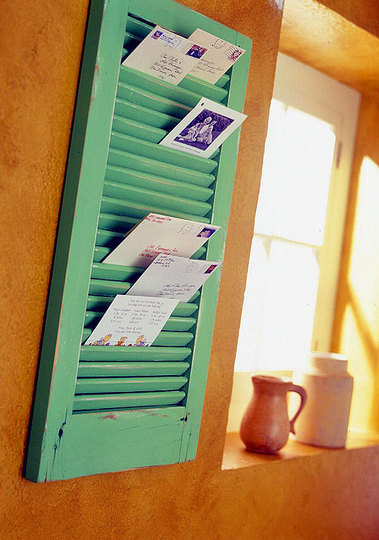
{Card & Mail Holders}
Shutters can also be used to hold mail and cards. I turned a couple of my shutters into Christmas card holders this year. I used small clothes-pins to attach my cards right to them.

I found this great idea at SCRAPHACKER, a brilliant (and cute) use of a shutter for a Post Card Rack!

{Backdrop for Smaller Accessories}
Have you ever found something you LOVE, but it's just too small to stand alone? A great use for shutters is to use them as a frame or a backdrop to display smaller items. In order to hang these cute chicken prints, I needed something larger. I simply attached 2 shutters with hinges and added hardware to create a piece on a larger scale; then hung my chickens with ribbon - easy peasy!
To see the post on exactly how I did these click HERE.

Look at this beautiful gallery wall idea from 2 friends & 2 cities. I've wanted to do this forever!

There are tons of great ideas on how to re-purpose shutters. If you want to try any of these ideas out, the first thing you should do is scan your local Craigslist and hopefully you can score some free ones too!
Have you ever decorated with shutters? I'd love to see your ideas!
Please send them in and I can share them with everyone!
Love you more than a garage full of shutters and endless possibilities,
Sunday
Thanks again Brooke for inviting me!